NOTE: coding involved.
HubSpot's new CMS only supports Google fonts out of the box. If you need to use custom or premium font(s), additional steps are required.
Step 1: Install or upload fonts
If you're using third-party font embeds like TypeKit, you can add the embed code into the domain from Content Settings.
If you're uploading custom font files, please upload them to your HubSpot portal's file manager. For better browser compatibility, we recommend uploading multiple font formats: TTF, OTF, WOFF, and WOFF2. You can use a third-party @font-face generator such as Transfonter.
Step 2: Create new CSS file + add @font-face declaration
- Open HubSpot Design Tools
- Create a new CSS file in any folder you prefer.
We recommend creating a separate folder for Atomic-related overwrites and new modules/templates. You can use the following folder structure:
BusinessName_Year
> modules
> css
> js
> templates - Add the @font-face declarations.
@font-face {
font-family: 'Open Sans';
src: url('OpenSans.eot');
src: url('OpenSans.eot?#iefix') format('embedded-opentype'),
url('OpenSans.woff2') format('woff2'),
url('OpenSans.woff') format('woff'),
url('OpenSans.ttf') format('truetype');
font-weight: normal;
font-style: normal;
font-display: swap;
} - Add font-family overwrites to the elements you need to overwrite.
- If you're overwriting globally (all text elements on the site), you can use the following:
body, h1, h2, h3, h4, h5, h6 {
font-family: 'Open Sans'
} - Or you can target each text element manually:
body {
font-family: 'Open Sans'
}

h1 {
font-family: 'Open Sans',
font-weight: bold;
}

h2 {
font-family: 'Open Sans',
font-weight: normal;
}

and so on..
- If you're overwriting globally (all text elements on the site), you can use the following:
Step 3: Assign CSS file to Domain
Once the @font-face CSS file is ready, the next step is to assign it to the domain from Content Settings.
- Open Content Settings
- Choose Website > Pages, and choose the domain we're assigning the fonts to.

- Scroll down to the CSS & Stylesheets section > click Attach style sheet
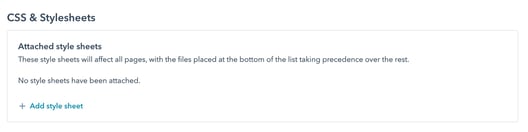
- Save